
Since iOS 15 was released, it has become more imperative than ever to start learning SwiftUI. It’s always nice for a developer to try new tech and a new project could be the best scenario to use this tool.
But what if you are working on an old application? Is it worth starting to integrate SwiftUI into a UIKit project? I’ll show you how we achieved it at Musixmatch.
While creating SwiftUI apps from the beginning it’s quite easy, it may not be so immediate to integrate it inside a UIKit application. Then, if you already started implementing Swift in an Objective-C codebase, SwiftUI would be probably the last of your thoughts.
It’s not about a technical barrier, but more about how to do it in the most efficient and smart way.
One of the main reasons is merge conflicts. If you are using storyboards, conflicts are right around the corner, and the bigger the team is, the more the problem shows up. Every iOS developer knows how storyboards conflicts can be annoying.
And If you are not using storyboards? Well, you won’t have this problem but you won’t be able to tell if the interface is right until you build the application.
The second reason is quite obvious: watch real time changes. SwiftUI gives you the advantage to see changes in real time thanks to the previews. You will be able to test the interface without building the application.
Another good point is to be quick at making changes. When you learn how to use SwiftUI in a proper way, it will be extremely easy to edit your interface, especially if it is just a matter of repositioning the elements inside the view.
Last but not the least: clear, concise and compact coding. You will immediately notice, when using SwiftUI, that it will take a third of the code to make a list, without any type of tableView delegates or other verbose stuff. Trust me: if you have been working on an old app with a still consistent part of Objective-C, this sounds like a dream!
In short: you avoid a lot of trouble and save a lot of time.
If you are working on old applications, you are most likely supporting older versions of iOS and, as you know, you can’t use SwiftUI unless you support at least iOS 13. You might be thinking: Easy! But no… Unfortunately, to support iOS 13 it is necessary to use the first versions of SwiftUI which are in some ways incomplete and do not directly provide all the tools you might need.
A trivial example is removing the default divider from a list with PlainStyle: you can’t. Well, you can’t do it directly through SwiftUI, but, if you did your homework well, you will surely know that under every SwiftUI element there is a UIKit component.
Yes, UIKit again.
You’ll need to access the UIKit component inside the List and the job is done.
That’s the reason why most of the people that are working with SwiftUI have dropped iOS 13 and now support only from iOS 14.
We made a decision to not do it yet, because we put backwards compatibility over making our lives easier :D
And then, let’s face it: even iOS 14 is not the best so you might as well just start from the previous version.
The first problem we have faced is compatibility. The Musixmatch app is, in fact, more than 10 years old. This means that the app was originally written in Objective-C. Some parts have been rewritten in Swift over time, but there is still a lot of old that will get replaced over time. In addition we also integrate some screens developed in React Native.
Due to these complexities, we have created a separate package to manage our design-system Ritmo, create and test new screens in SwiftUI. These screens are either old ones that we redesigned or completely new ones.
Thanks to this package we can also use the previews to test the UI, which otherwise would not be available. Using the package means that the screens would not directly access the main app but the app will pass to the screen all the information it needs to be built. Basically, we took VM out of our M-V-VM design pattern and put it inside this package.
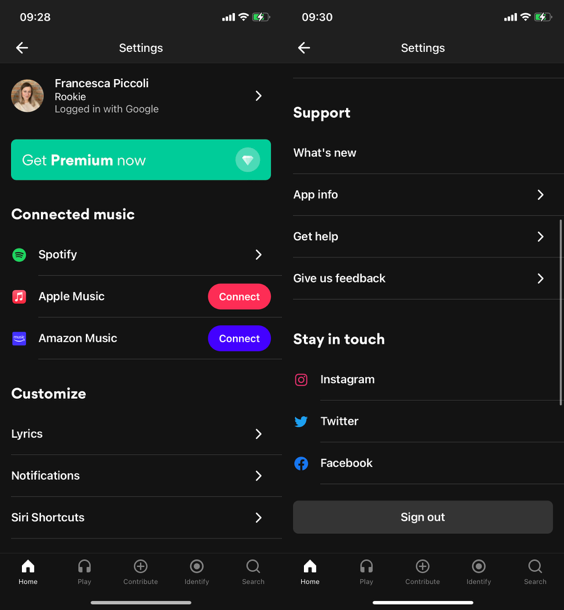
I’ll give you a concrete example: the settings page.
The first thing we do is to create a model, which is the VM (ViewModel) of the design pattern. This needs to be a public class with ObservableObject property. All its variables are declared as @Published, to make it possible to update the controller.
You can see from the image that MXMSettingUser stores variables of type String, Url, UIImage and MusicSettingsProvider, which is a Enum. So, this model does not know anything of the models from the main app.
Next step is to create our MXMSettingsView.
This will declare the model and the callback to manage the button actions.
SwiftUI does not support the delegates anymore, so we need to create a completion block that is called every time an action is triggered.
@OservedObject here means that MXMSettingUserModel conforms to the ObservableObject protocol while MXMSettingsActionCompletion is a typealias:
MXMSettingsActionType is an Enum used to differentiate the type of action. As you can see from the next images, there are a lot of buttons inside our view, so this is the clearest way to manage all of them.
Once all the input data has been prepared, we can start drawing the screen. This is a code example of how we implemented the Support section and all the related callbacks.
Our SwiftUIView is finished. So let’s move on to implement it inside the main app.
We create the MXMSettingsViewController class that inherits from MXMViewController (our custom UIViewController). We also import SwiftUI framework and the design-system package Ritmo_iOS.
Remember: our app contains Objective-C that cannot natively support SwiftUI, so we need this Swift controller to be able to interact with it.
In ViewWillAppear we populate the model and the settingsView.
As mentioned before, MXMSettingsView has a callback that returns the MXMSettingsActionType information, so we can switch the action type to locate the trigger button and write the corresponding code.
We are almost at the end. The last thing we have to do is to add the SwiftUI view inside the UIViewController. Fortunately, SwiftUI comes to our aid, providing us with the UIHostingController object. To make things easier we have created a function inside our MXMViewController.
Then we can go back to MXMSettingsViewController and insert this code at the end of viewWillAppear.
Thanks to the @ObservedObject property assigned to the model and the @Published one to its variables, we have direct access to edit the screen.
Yes, we are using the reactive programming logic with SwiftUI, so if we edit one of the observed elements, this will affect and update all the screen.
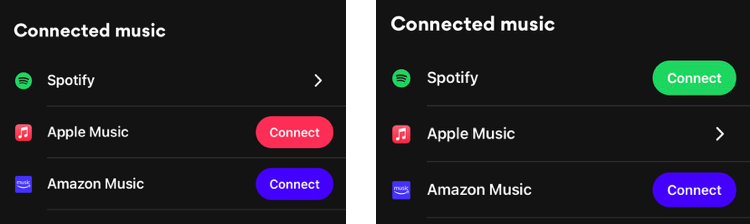
In our case, we need to update the settings page when the user changes the music provider, for example switching from Spotify to Apple Music. When this happens, the function reloadStramingServiceSection() is called so we can get the current connected provider and assign it to the SwiftUI view.
This will automatically update your controller, as you can see in the images below.
NB: all the observed variables on which the screen depends must be written in this format: $model.variable. For example, in our case, we wrote $user.musicProvider. This is the code for the music provider button.
The first approach to SwiftUI could be problematic, especially if you’ve never dealt with reactive programming concepts, but the process will get faster and faster the more you use it.
The advantages we have gained from SwiftUI are immense and it helped us a lot in the creation of our design-system Ritmo, thanks to the ease of creating reusable UI components. Even though, having to support iOS 13, we can’t use it to its full potential, we still decided to push ahead in order to be ready when we will develop on the latest versions.
Gradually adopting SwiftUI in a UIKit app was originally published in Musixmatch Blog on Medium, where people are continuing the conversation by highlighting and responding to this story.