PUBLISHED: Feb 10, 2017
DESCRIPTION:
Subscribe us : http://www.youtube.com/NupurAudioIN
Facebook : http://www.facebook.com/NupurAudio
How to do Surya Namaskar: The 12 Poses
Step 1 (Prayer pose)
Stand at the edge of your mat, keep your feet together and balance your weight equally on both the feet. Expand your chest and relax your shoulders. As you breathe in, lift both arms up from the sides and as you exhale, bring your palms together in front of the chest in prayer position.
Step 2 (Raised Arms pose)
Breathing in, lift the arms up and back, keeping the biceps close to the ears. In this pose, the objective is to stretch the whole body up from the heels to the tips of the fingers. To get maximum benefits, you may pull the pelvis forward and ensure reaching up with your fingers rather than going backwards.
Step 3 (Hand to Foot pose)
Breathing out, bend forward from the waist, keeping the spine erect. As you exhale completely, bring the hands down to the floor, beside the feet.
Step 4 (Equestrian pose)
Breathing in, push your right leg back, as far back as possible. Bring the right knee to the floor and look up.
Step 5 (Stick pose)
As you breathe in, take the left leg back and bring the whole body in a straight line and keep your arms perpendicular to the floor.
Step 6 (Saluting with eight points or parts)
Gently bring your knees down to the floor and exhale. Take the hips back slightly, slide forward, rest your chest and chin on the floor. Raise your posterior a little bit .The two hands, two feet, two knees, chest and chin (eight parts of the body) should touch the floor.
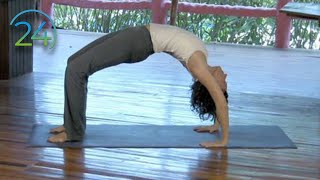
Step 7 (Cobra pose)
Slide forward and raise the chest up into the cobra posture. You may keep your elbows bent in this pose, the shoulders away from the ears. Look up. As you inhale, make a gentle effort to push the chest forward; as you exhale, make a gentle effort to push the navel down. Tuck the toes under. Ensure you're stretching just as much as you can; do not force.
Step 8 (Mountain pose)
Breathing out, lift the hips and the tail bone up, chest downwards in an 'inverted V' (/) posture. If possible, try and keep the heels on the ground and make a gentle effort to lift the tailbone up, going deeper into the stretch.
Step 9 (Equestrian pose)
Breathing in, bring the right foot forward in between the two hands, left knee down to the floor, press the hips down and look up and place the right foot exactly between the two hands and the right calf perpendicular to the floor.
In this position, make a gentle effort to push the hips down towards the floor, to deepen the stretch.
Step 10 (Hand to foot pose)
Breathing out, bring the left foot forward. Keep the palms on the floor. You may bend the knees, if necessary. Gently straighten the knees and if you can, try and touch your nose to the knees. Keep breathing.
Step 11 (Raised Arms pose)
Breathing in, roll the spine up, hands go up and bend backwards a little bit, pushing the hips slightly outward. Ensure that your biceps are beside your ears. The idea is to stretch up more rather than stretching backwards.
Step 12
As you exhale, first straighten the body, and then bring the arms down. Relax in this position; observe the sensations in your body.
Subscribe us : http://www.youtube.com/NupurAudioIN
Facebook : http://www.facebook.com/NupurAudio