Enclosure:(audio/mpeg) https://www.attackmagazine.com/wp-content/uploads/2022/09/modmatrix-final.mp3
If you are unsure exactly what a mod matrix is, in this article, we go deep within the mod matrix in SynthMaster 2. We're going to take a static sound, add rhythm and movement while explaining how it all works.
The modulation matrix (more commonly known as a mod matrix) is where information about all of your synthesizer’s modulation sources and destinations are available. Think of it as a place to keep track of all the wobbles. The first mod matrix appeared on the Oberheim Matrix 12 in the mid-‘80s and things have only gotten more complicated since then - so complicated, in fact, that it can be intimidating for beginners. This is a shame, as mastering the mod matrix and using it to add movement and interest can help your sound creations come to life.
In this Synth Secrets, we’ll be using the mod matrix on KVR331 Audio’s SynthMaster 2 to spice up a static note with rhythmic pulses and other modulations.
Want to follow along? Download SynthMaster 2 for free to copy the steps.
Here’s what we’re going for:
N.B: We recommend following along with headphones or studio monitors as some of these results can be subtle. As ever, click any image to see a larger version.
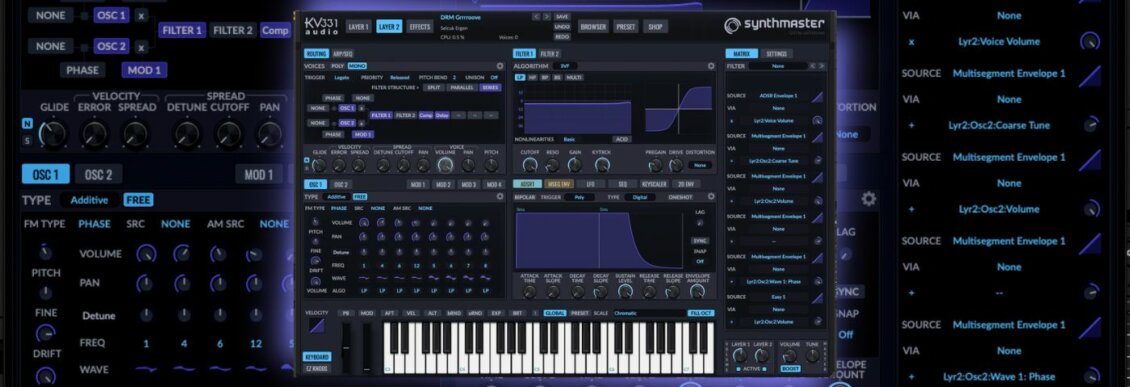
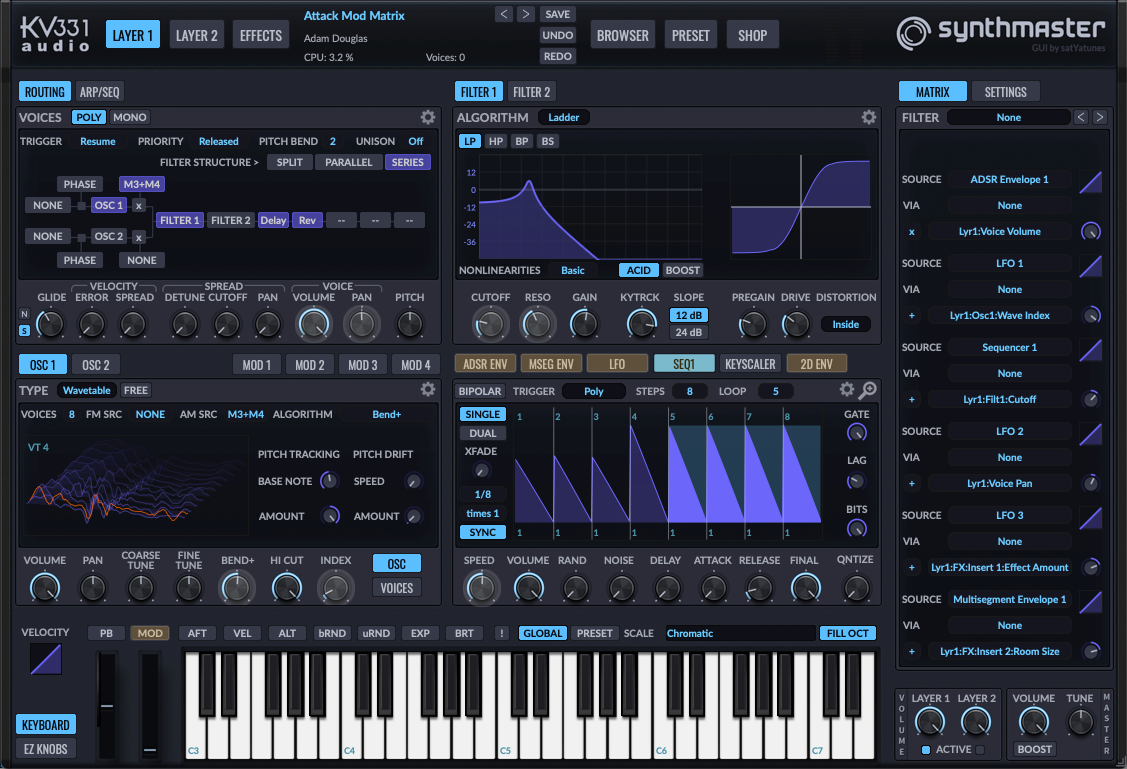
[advert]SynthMaster 2 has powerful modulation capabilities, with a whole host of sources (the things doing the modulation such as envelopes and LFOs) and targets (the parts being affected like cutoff frequency or volume). Every modulation assignment is shown in the modulation matrix column on the right-hand side of the synth. Here you can not only see your modulation connections but also make adjustments.
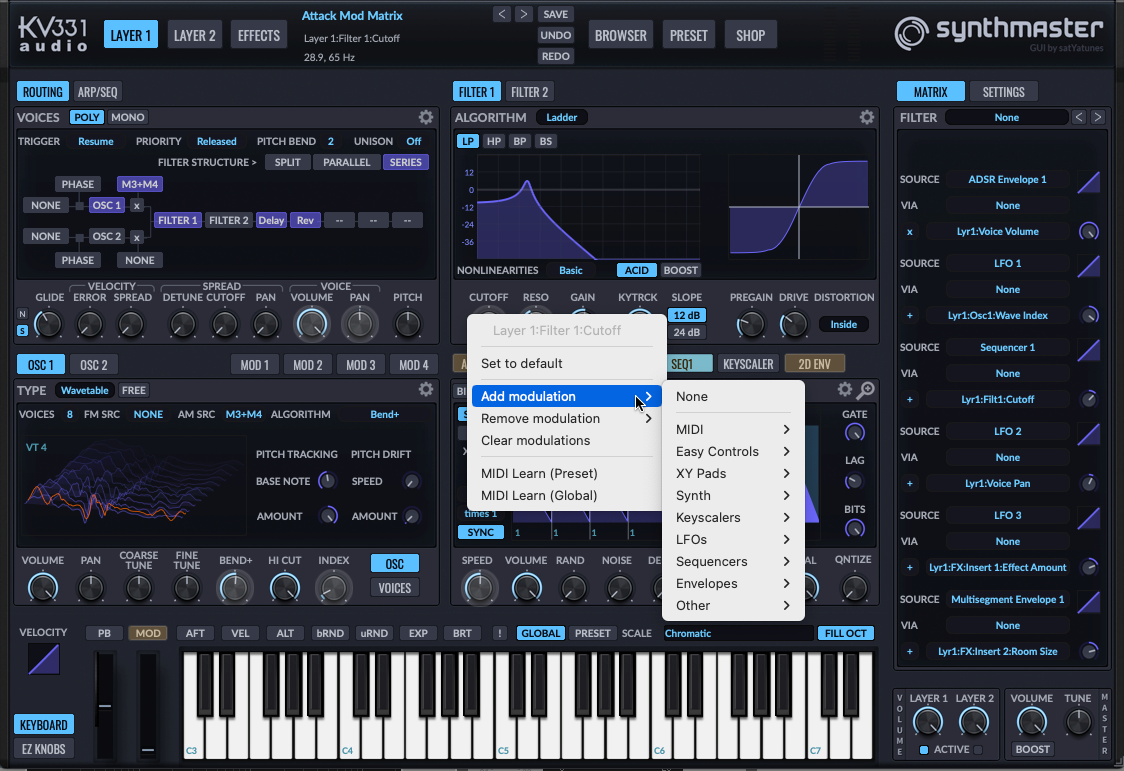
There are two ways to assign modulations in SynthMaster 2.
SynthMaster 2 has many modulation sources and destinations - too many to list here - but following along here will give you a good idea of what’s available.
This tutorial will focus entirely on the mod matrix. We’re assuming you’re already familiar with SynthMaster 2’s other sections such as the oscillators, filters and effects. If not, get up to speed with our previous synthesis tutorials:
Making An Acid Bassline With SynthMaster 2
Using SynthMaster 2 To Programme A Piano Using Additive Synthesis
[advert]We start by setting up the wavetable oscillator in unison mode with eight voices, adding a Moog-style Ladder filter and hooking up some effects (delay, reverb, distortion).
We also draw in some notes. Our end goal is a pulsing and rhythmic line to complement the beats and bassline of our drum and bass track.
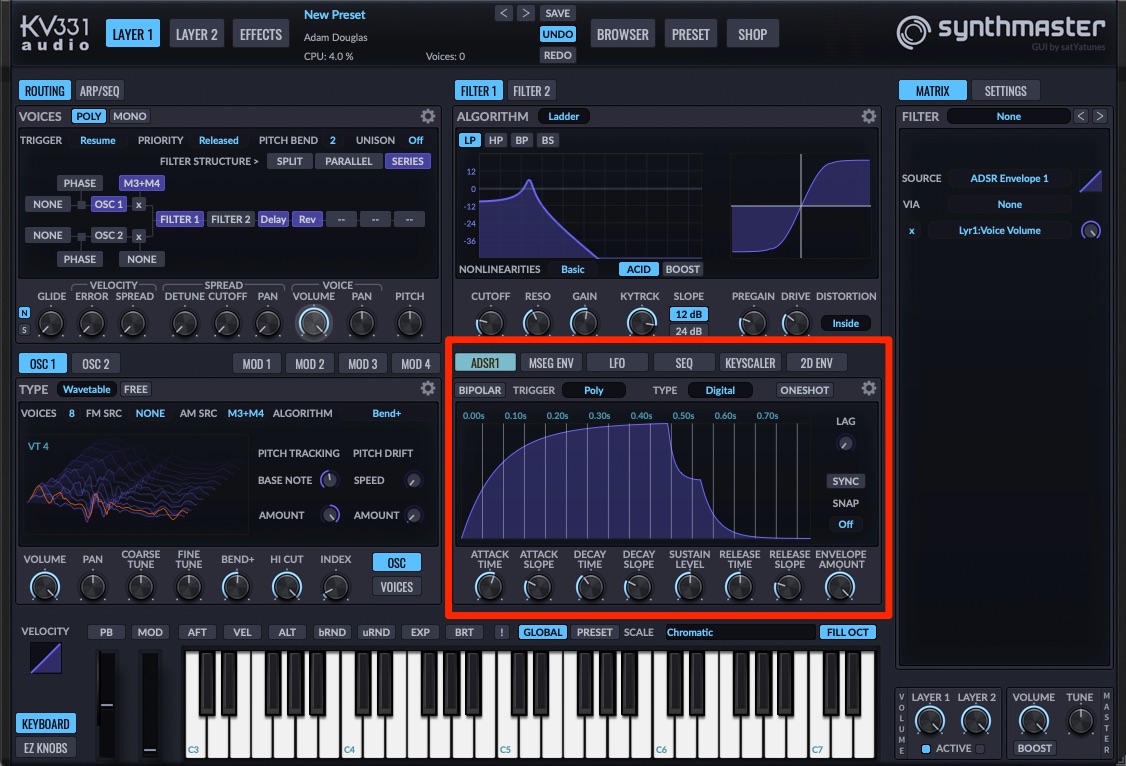
The first modulation connection is the ADSR envelope and amplitude, or overall volume. This is done automatically by SynthMaster 2. We can see that it’s already listed in the mod matrix on the right. All we have to do is shape the envelope to our liking.
With ADSR envelope assigned to amplitude:
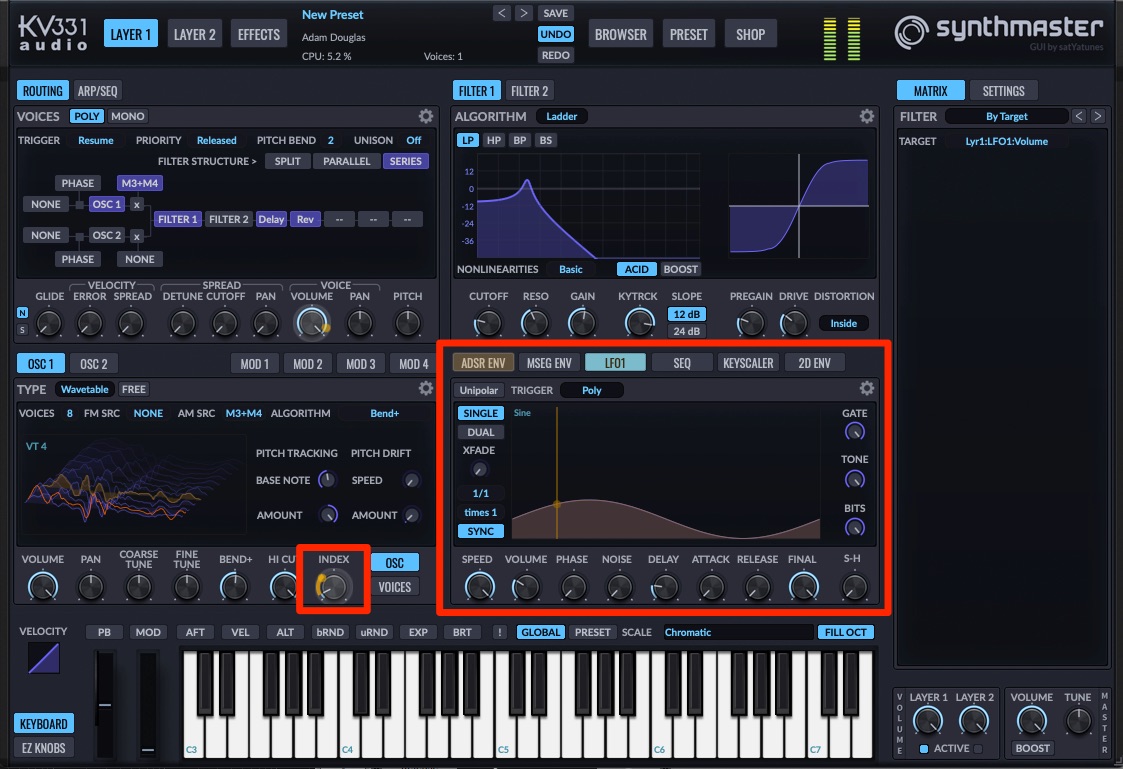
Let’s get things moving. We’ve gone with a wavetable oscillator for our sound source specifically because it offers a number of modulatable parameters. We’ll start with wavetable index, or playhead position.
Right-click on the Index knob and choose LFO 1. We’ll stay with the default sine wave. Next, we drag on the gold band around the Index knob to increase the amount. We don’t want a massive, swinging effect, just some subtle movement, so we decrease the amount of LFO by lowering the Volume knob. We then hit the Sync button and change the Beat Multiplier setting to 1/1 for a slow and easy oscillation through the wavetable.
Modulating the wavetable index with LFO 1:
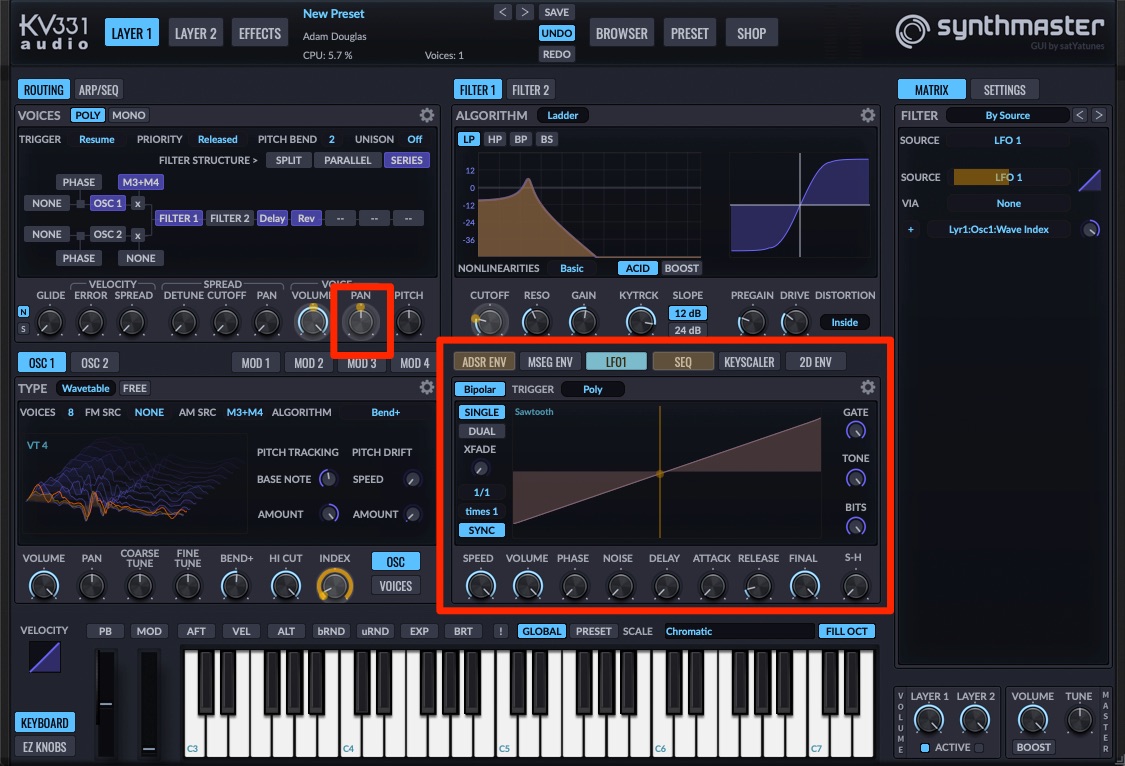
Let’s try modulating the stereo image next. In the Voices section, we right-click on the Voice Pan knob and select LFO 2.
We want a pan that sweeps from left to right so we choose a sawtooth wave from the waveform pop-up menu (click on the name of the waveform in the waveform screen) and make sure it’s set to bipolar. This way it will pass through the 0 point, or the center of the sound stage.
We sync it to the DAW with a rhythm of 1/1. Finally, we fine-tune the amount so it’s not too wide.
With LFO 2 modulating panning:
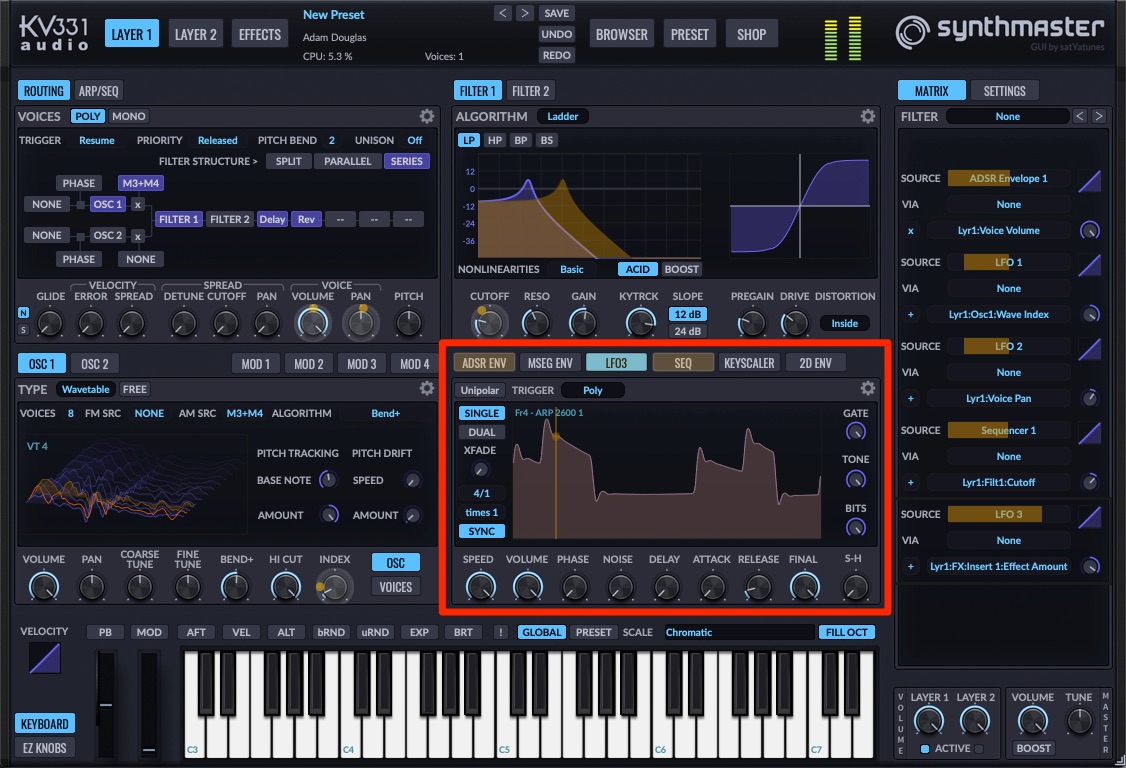
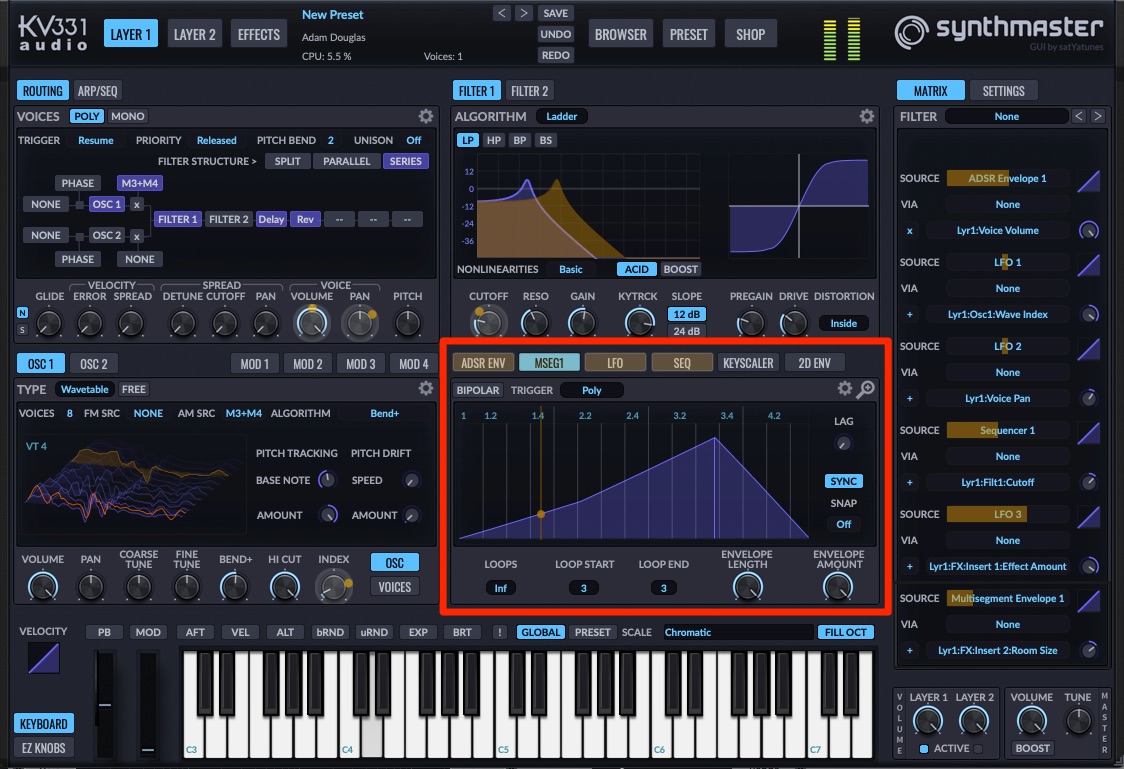
Modulating the filter cutoff should give us more to work with. Instead of just an LFO through, let’s set up a modulation sequence to make it more interesting.
We right-click on the Cutoff knob and choose Sequencer 1 as the source. It gives us a series of eight sharp sawtooth waveforms. We shape them to give us a nice, pulsing effect and sync it to DAW tempo with a rhythm of 1/8. Adjusting the Lag amount lets us play with the push and pull of the sequencer rhythm.
With Sequencer 1 modulating the cutoff:

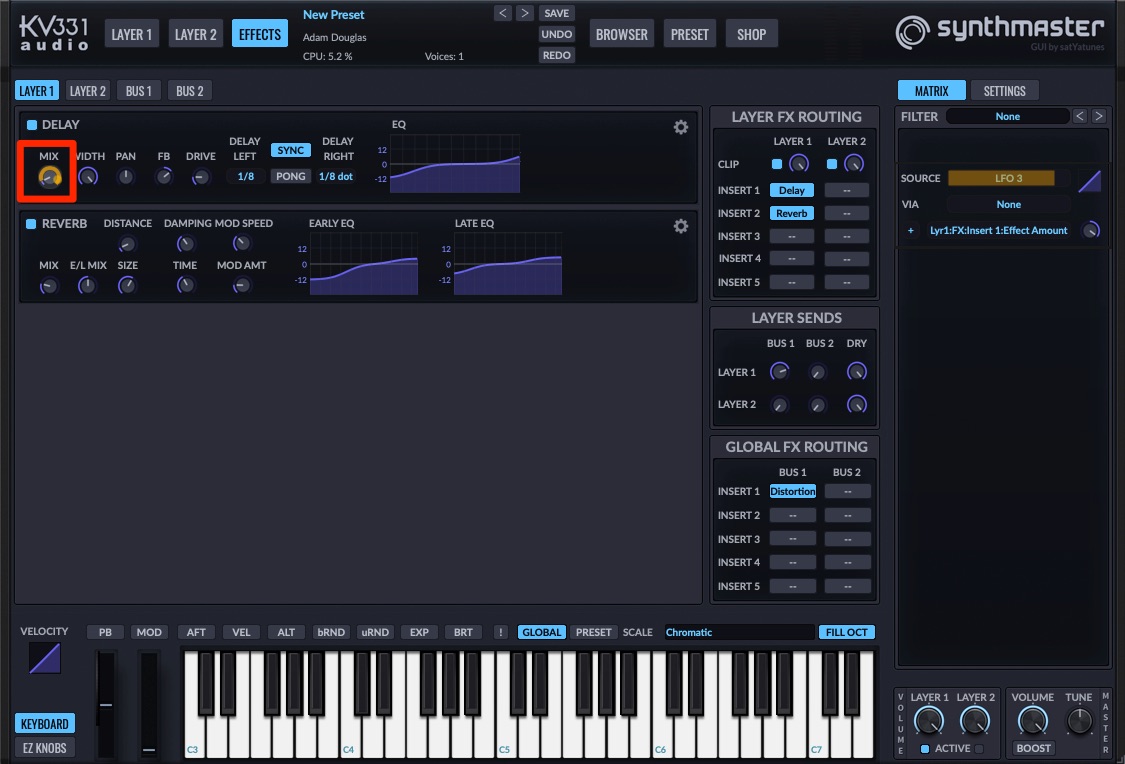
Let’s move on to the effects next. In the Layer 1 effects slot, we have Delay and Reverb modules already set up. They’re adding effects but they’re not dynamic, they’re static. Let’s address this with modulation.
We can tie the delay amount to an LFO. We do this by right-clicking on the Mix knob in the Delay module and choosing LFO 3. Instead of the usual waveform, let’s go with something a little more esoteric this time. We click on the waveform and select “Fr4 - ARP 2600 1” from the pull-down menu, a single cycle wave sample from an ARP 2600. We sync it to tempo with a slow rate of 4/1.
Finally, we bring the modulation amount all the way up on the Delay Mix dial. Now the amount of the effect versus dry signal changes depending on the ARP 2600 waveform.
LFO 3 modulating delay amount:
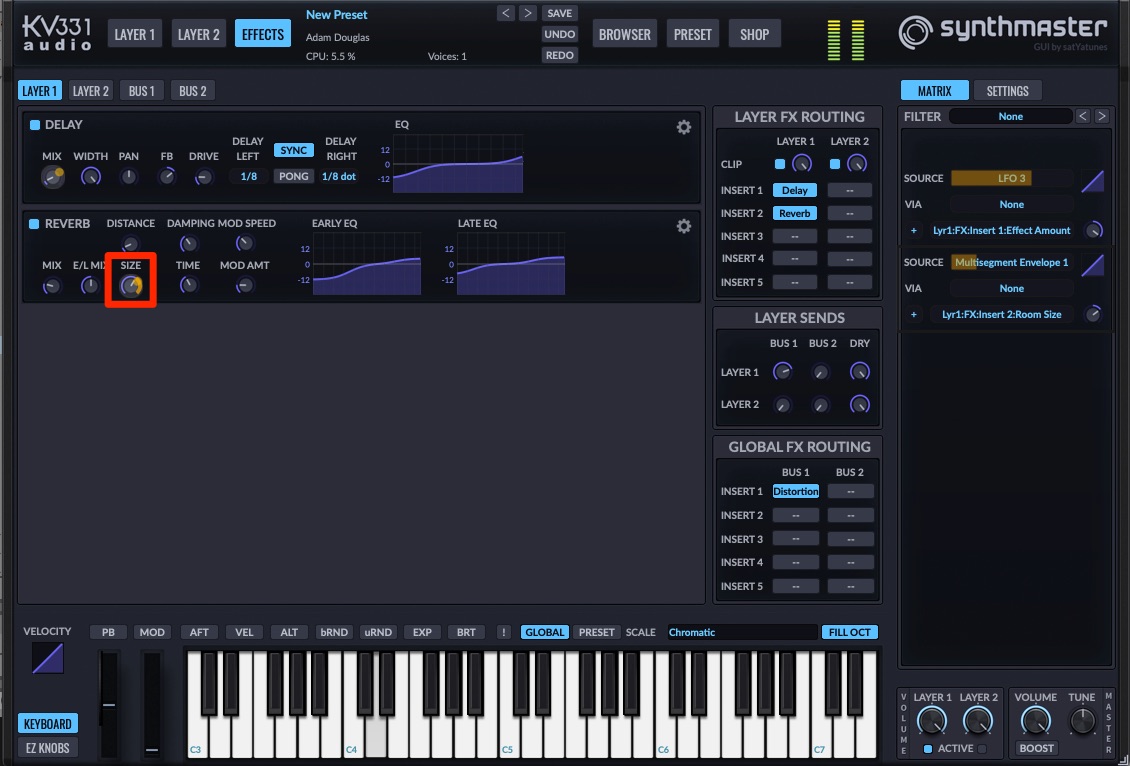
Next, let’s modulate the Reverb module’s Room Size parameter to create a fantastic reverb effect that periodically expands over time.
In the Reverb module, we click on the Size dial and choose Multisegment Envelope 1 from the Envelope menu. Unlike a typical ADSR envelope, the Multisegment Envelope has up to 16 nodes that you can freely adjust. We create a ramp shape as we want our reverb size to increase over time.
Multisegment Envelope 1 controlling the Reverb Size:
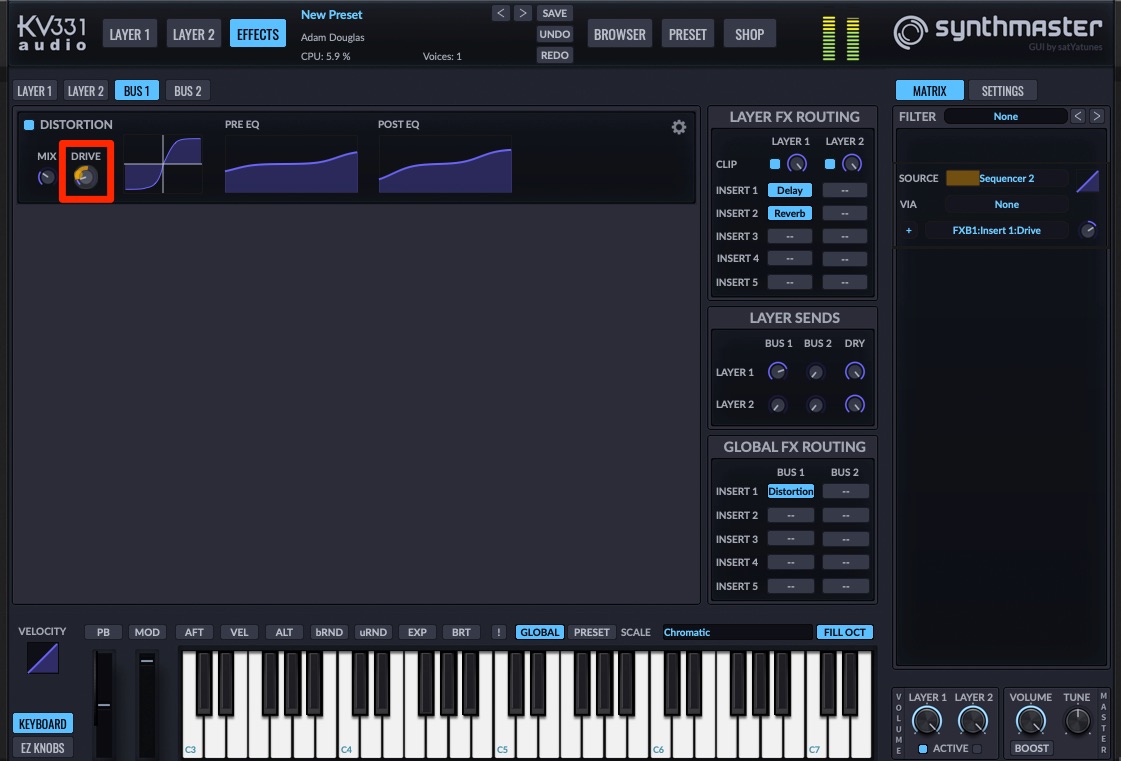
For the final effect, let’s modulate the drive circuit on the Distortion module on Bus 1 to add rhythmic saturation. Just for fun, let’s do it with a sequencer.
We again right-click on the Drive knob, select Sequencer 2, and draw in some modulation curves. We try different synced tempos and find that 1/8 works best. Finally, we bring down the modulation amount on the Drive knob to keep the volume from overloading.
Top Tip: Add more drive for a filthy, distorted sound.
The drive being modulated by a sequencer:
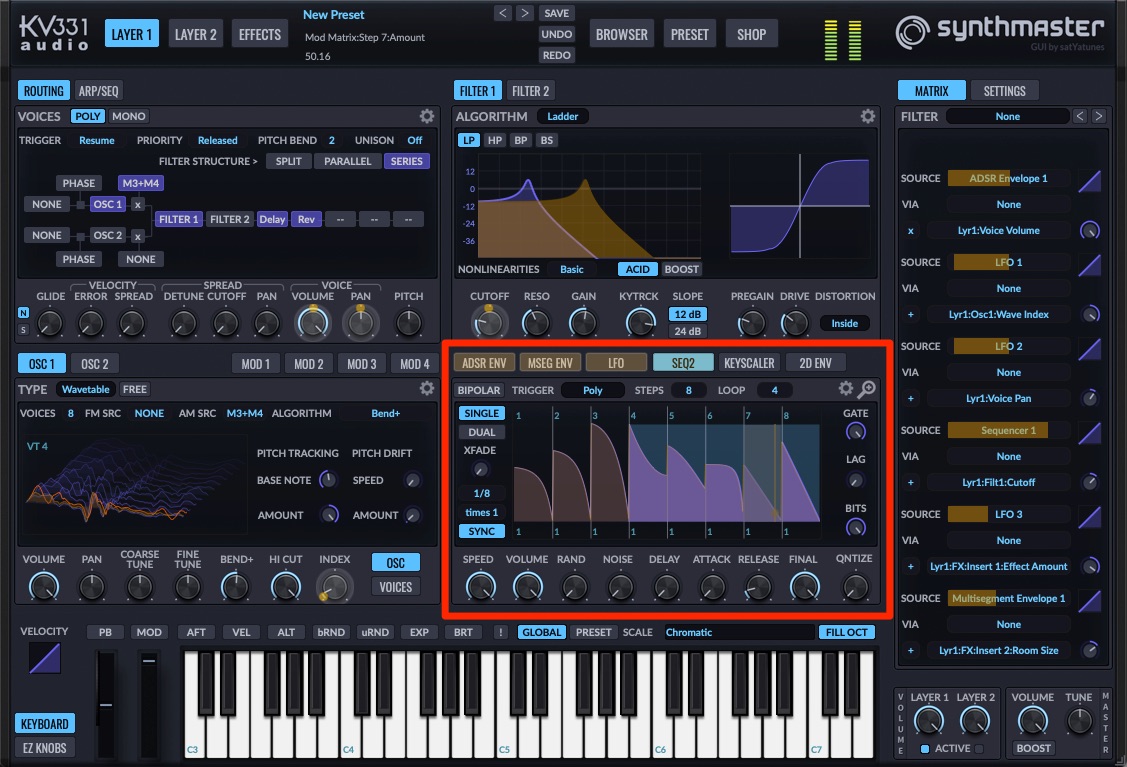
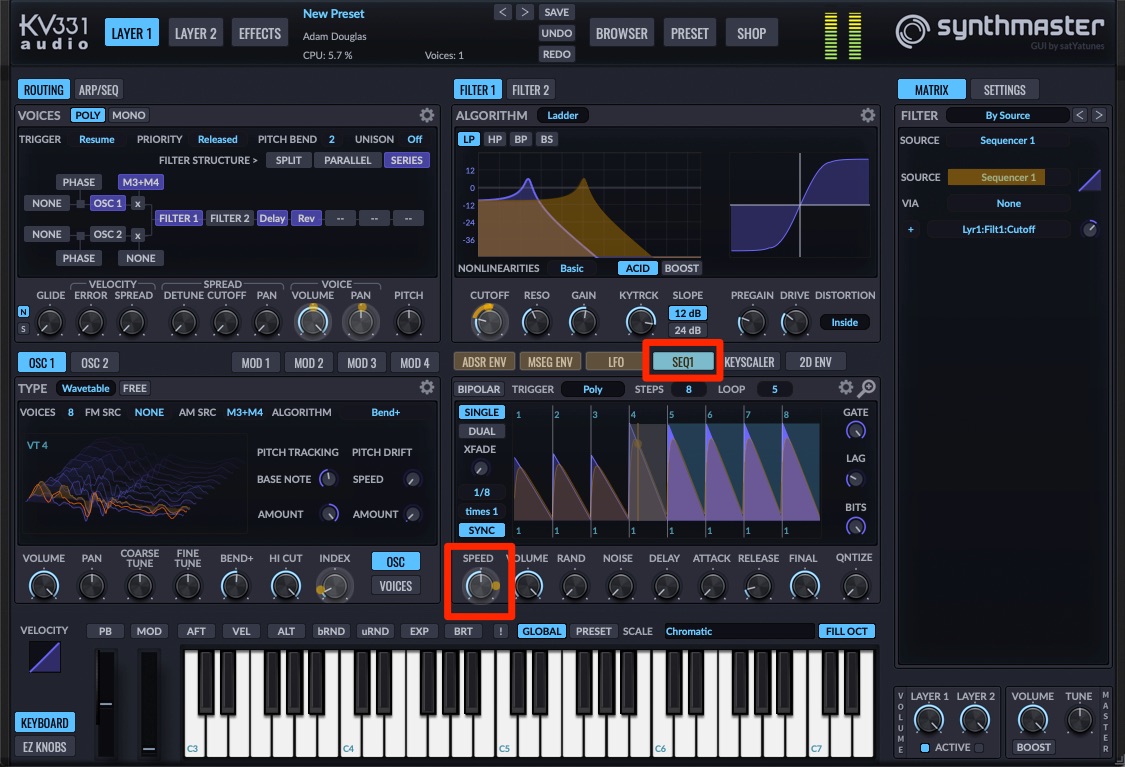
In synthesis, there’s nothing more fun than modulating a modulator. Let’s revisit Sequencer 1, which is affecting the cutoff amount, and see if we can’t make some adjustments to it to change up the rhythm.
We start by opening up Sequencer 1 (right-click on the SEQ tab to choose) and then right-click on the Speed knob at the bottom.
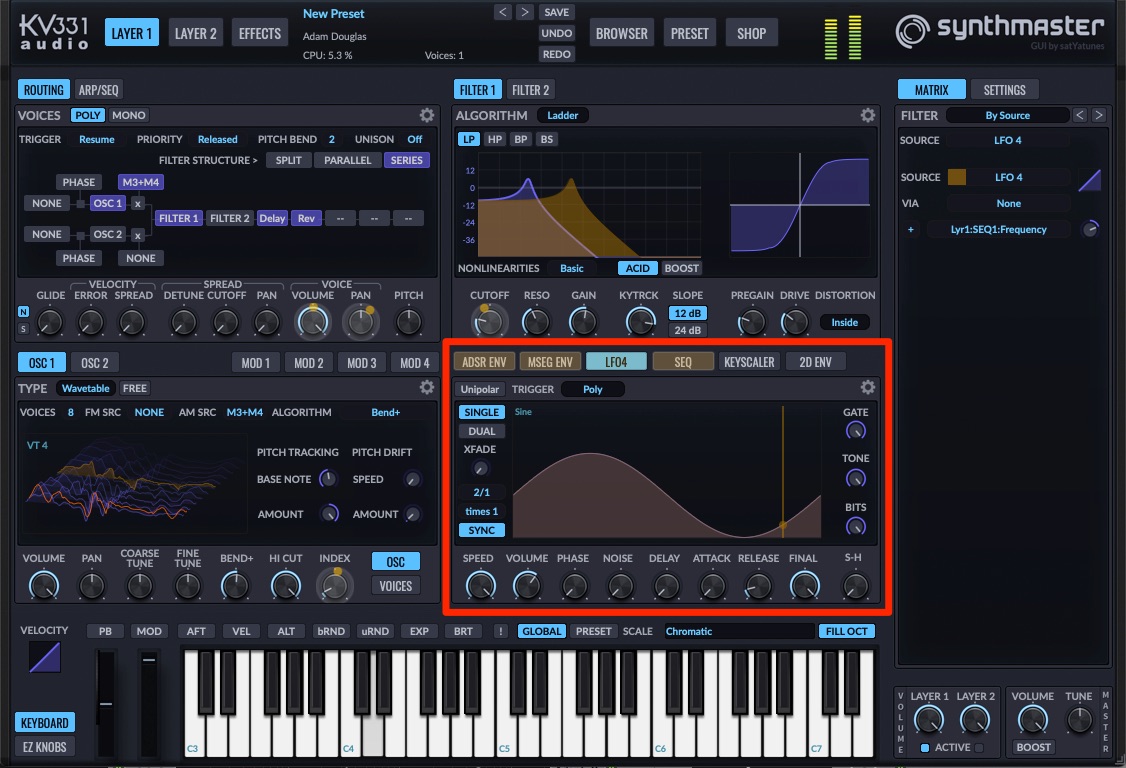
We select LFO 4 as the destination. A sine wave LFO with a slightly reduced Volume amount works well, causing the sequencer’s rate to change along with the rise and fall of the LFO. We can then adjust the amount of modulation to taste.
LFO 4 modulating the speed of Sequencer 1:
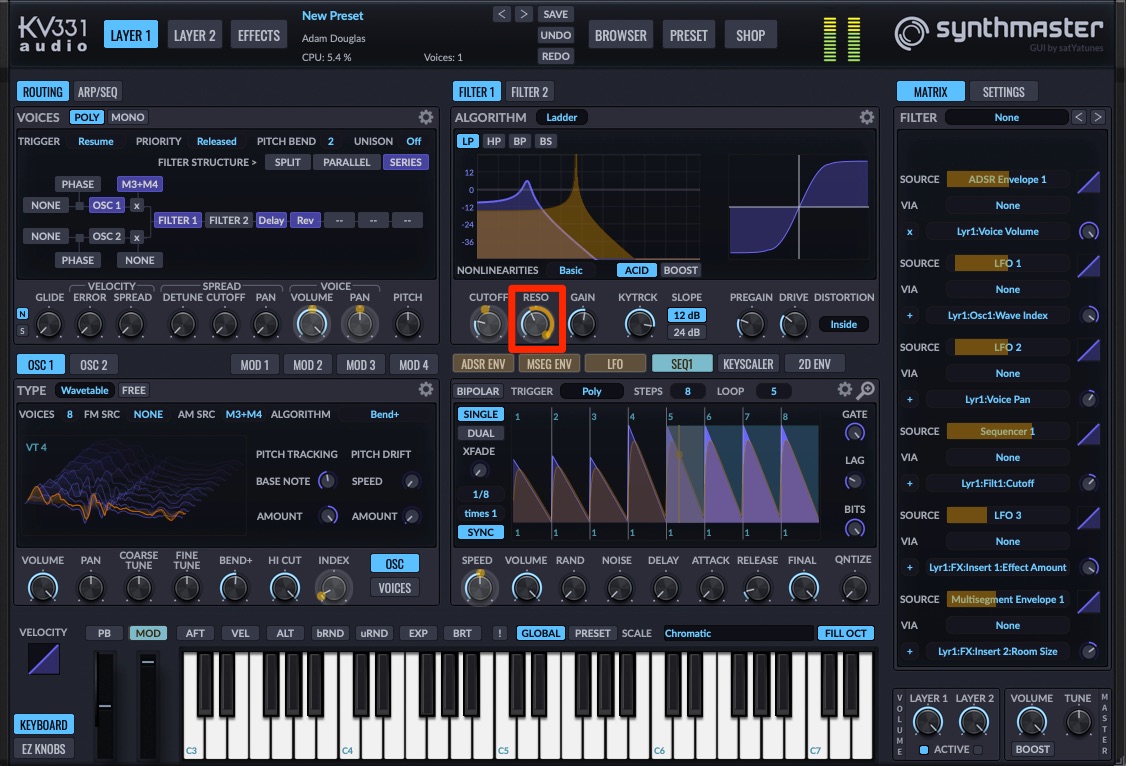
For the final step, let’s use the mod wheel on our MIDI controller to manually bring up the resonance as each note progresses. As before, we right-click on the Resonance knob and choose CC01-ModWheel from the MIDI menu in the pop-up window. Now we can arm the MIDI track in our DAW for recording and overdub the modulation.
With manual modulation of the resonance:
Here’s our finished sound in the context of a drum and bass track with loops from the Splice packs Dead Drop 002 - Bass and Toolroom Academy - Raw Drums plus some additional production: